Tuesday, April 9, 2013

Updated Cubify Client Software Available

As I started my Cube Client this evening, an alert popped up stating that a new version of the Cubify Client software was available.  Based on past experience, no time was wasted on downloading and installing the new update.

WITH EVERY UPDATE

Make sure that you go into the  Settings dialog to restore your preferences.  Each new install resets rafts to ON and Supports to ON.  And, 1st Generation Cube owners will have to reselect their printer type.

OBSERVED IMPROVEMENT

Other than the new green splash screen, no changes were immediately obvious.  But,  it just so happened that the piece that I wanted to print was the perfect piece to demonstrate what I THINK is going to be a hugely popular improvement.

One of the things all of us would like to see is a set of Release Notes for each new version.  As far as I know, there are none.  So, risking total embarassment if wrong, I'm going to offer an improvement that I believe I see.

No matter which 3D printer you've used, chances are it had issues with small gaps in areas around holes.  It is especially prominent when holes are close together or near walls or edges.  It is a very common 3D printer behavior. 

Whether or not the improvement came in this new version or not, the Cubify Client now seems to have fixed that issue!  If what I THINK I see is true, then it also may have ramifications for relatively thin wall construction.  Time for some serious testing!

In the meantime, here is an image, albeit poor, of the part that demonstrates what I am seeing.
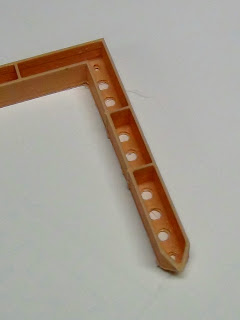
Small Holes in Close Proximity
The hole sizes are 4mm and 3mm.  Distance between the holes is 2.75mm and from the holes to the walls is just 1mm.  All areas are perfectly and completely filled.

The designed specification for the outer walls in this object are 1mm with inside walls of .5mm.  Interestingly, the inexpensive calipers from Harbor Freight measure various spots on the outer walls between .90mm to 1mm and the inner walls from .66m to ,87mm.depending on the orientation. 

Tuesday, April 2, 2013

What to Do When the Cube Clogs.

While it is not an every day occurance, when a clog happens it is bound to be disappointing as amply illustraetd by this email I got a few minutes ago...

Well... Got the clicking sound this morning and I suppose the darn thing is clogged although I don't get why or what caused it.

So, I tried to remove the cartridge so I could see if the filament was still pointy, but the unit does not let me discharge the filament. It stays on the first step the whole time... Just saying to move the tube away...

So the filament is still installed...

Any suggestions for how to resolve this?

I hate to bother you. Just a week old and already. I can already think of some design tweaks for this unit that could help with this, but for now I am stuck...

D...
That's OK.  I'm here to be bothered.  I've chosen that role and I enjoy helping.

I know exactly how "D" feels.  It's no fun to have to put everything on halt while you attack a clog.  But, let me assure you that I don't know anyone with any extrusion 3D printer that doesn't face it at some point.

First, let's look at some potential causes.  The first, and foremost, is a print gap that is too small.  While a single sheet of paper might not seem very thick, that is just enough gap.  Binding the paper as you set the gap can be a potential problem.  The second cause can be a plate that wasn't fully seated, so that part of the place touched the print head.  And, the last potential cause is an impurity in the filament that causes it not to melt at a particular place in the filament stream.  Though, the latter is rare, it can happen. 

So then what?

When "D" talks about not being able to discharge the filament, I know what they are seeing because I have recently seen it myself.  I hate to say just pull hard.  But, that is the only solution that worked for me when it happened.  I think that it probably happens when the filament has an impurity.  Not only will it not melt to create the object; but, may not be melting enough to release the filament.  Pulling hard eventually worked.  But, then, as "D" pointed out, the screen didn't move on.

In that case, press the large start/stop button to go back to the menu.  Cut off two or three inches of filament before starting the loading process again.

Here is where the nifty spring wire comes into play.  When the Cube heated up, I ran the wire, from the top, into the head and pushed out any melted filament through the nozzle just to clean it out before inserting the filament again.

Once the filament is loaded, be sure to recheck your gap.  If it is not perfect, go through a two step process of resetting the gap.  First set a ridiculously large gap and save it.  Then do the process again.  But, this time being careful NOT to raise the table high enough to hit the print head.   If the table hits the print head.  Start over with a wide gap.

Please let me know if this is confusing to you or if it is helpful.  In the meantime, thanks to "D", I'm going to report the fact that filament doesn't always unload easily to the Cube team.  I don't like to jump to conclusions unless someone else verifies what I THINK I've seen.  And, "D" did just that.  THANKS!

Monday, April 1, 2013

The Quest is Part of the Satisfaction

As you may have noticed, the posts to this blog have been infrequent for a while.  That is NOT because my interest in the Cube and 3D printing has waned.  Quite the contrary is true. 

The reason for the infrequency is that I have been using one or both of my Cube printers on almost a non-stop basis creating prototypes for a device that has been a longtime dream.  The Cube has been the focus of a quest and that quest has taken me on a design journey of discovery, insight and, sometimes, perplexing roadblocks.

But, quests are probably at the core of the satisfaction that comes from owning a 3D printer.  And, each small step in a design quest has the potential to spawn a new quest at any time.

My Current Quest

A quest usually involves one's passions.  As I have mentioned before, I have had a lifelong passion for microscopy.   And, being able to capture the microscope images has been a longtime extension of that passion.  What has kept me occupied and limited my blog updates is a quest to design and build a device that combines these passions.

The cool thing about this quest is that it combines complexity with the need for incredibly accurate alignment.   While the first Cube could do the job of delivering models that would work, it was the 2nd generations Cube that really made the project take off.


2nd Generation Cube's Primary Contribution to the Quest

I have been amazed at the accuracy of the 2nd Generation Cube.  Parts fit is now much easier than with earlier 3D printers.  The system that I'm designing has more than 10 parts that must fit together well and at least seven of those parts must move with precision if the design is to be successful.  Moreover, some features have to be fitted with off-the-shelf items like screws and nuts.

I've come to trust that the 2nd Gen Cube is going to be able to deliver, repeatedly, the same precision with each iteration.  This is not only important; but, critical for those of us hoping to design products that others can print on their own 2nd Gen Cubes.  And, it's also good news for those that would be ordering the products Cubify.com that will be printed with much larger 3D printers.

The Quest is nearing Completion

While few design quests end with finality, this one is at least nearing the time when a version is mature enough to be released.  When that happens I want to share the journey because some perfectly good breakthroughs didn't make it to this product for any number of reasons.  But, that does not mean that these design features will not be useful to us in other products.  For instance, I learned how to design sliding parts with ratcheting locks.  But, the final design no longer needs that feature.  I've also learned a lot about parts with springlike give without breaking.  Discoveries regarding filament "grain" and part printing orientation were a natural consequence of such an intense design effort.  I will share those as well. 

Hopefully, by the end of this weeks, we can begin to explore some of the things that came out of this quest so that they might help you in your own future design quests.  It's been a lot of fun.