While I have no idea what algorithms are used in determining the center of the tip during printing, we can create test objects that give us some idea as to how the print engine interprets our designs. We do this by creating specially designed objects of known size and shape. We can then print these objects and measure them to see how they compare to our original drawings.
I believe that the PrintJet opening in the cube is .5mm. This means that plastic should extrude at a minimum of .5mm, with .25mm on each side of the center of the PrintJet. However, the Cube prints in .25mm layers. This means that the plastic is flattened by the PrintJet tip. Push down on the top of the molten plastic and you should get a strand that becomes WIDER than .5mm. Pushing down creates a strong bond between layers. But, it also means that there may be some difference between the object as we design it and as it printed.
We're going to try to identify those differences with a test file. This video demonstrates how the test file was created using Moment of Inspiration (www.moi3D.com).
Most people with experience with 3D printing would say that beginning with .25mm wide objects is pointless since the PrintJet head, itself, is .5mm wide. But, what we are looking for is the BEHAVIOR of the printer from very narrow to wider. We're asking the question, "At what point does the printer start to best match the designed width of the object. So, beginning low and going up makes some sense to make sure we cross that sweet spot.
Once the file was created, I printed it on both the Cube 3D printer and the RapMan 3.2 3D printer. This provides some context and comparison that is helpful in trying to understand how to design for 3D printers.
We start with the Cube printer result...
Object 1: A Cube .25mm Wide and 3mm High
 |
| Designed .25mm - Printed .83mm |
Object 02: A Cube .5mm Wide and 3mm High
 |
| Designed .5mm - Printed 1.05mm |
It's interesting that when we moved to .5 mm in our design the printer still created a perimeter. But, it did not overlap the extrusion, It laid both the directions side by side almost perfectly to create an object just over 1mm wide. The object looks well fused.
Object 03: A Cube .75mm Wide and 3mm High
 |
| Designed .75mm - Printed 1.04mm |
As we move to an object that was designed to be .75mm wide an interesting artifact begins to show itself. Notice that the walls have a gap! This is a very well known, if somewhat puzzling, artifact within the 3D printing community. At first, it's very annoying. But, you soon learn to design to minimize its affect. In this case, the object printed at 1.04mm
Object 04: A Cube 1mm Wide and 3mm High
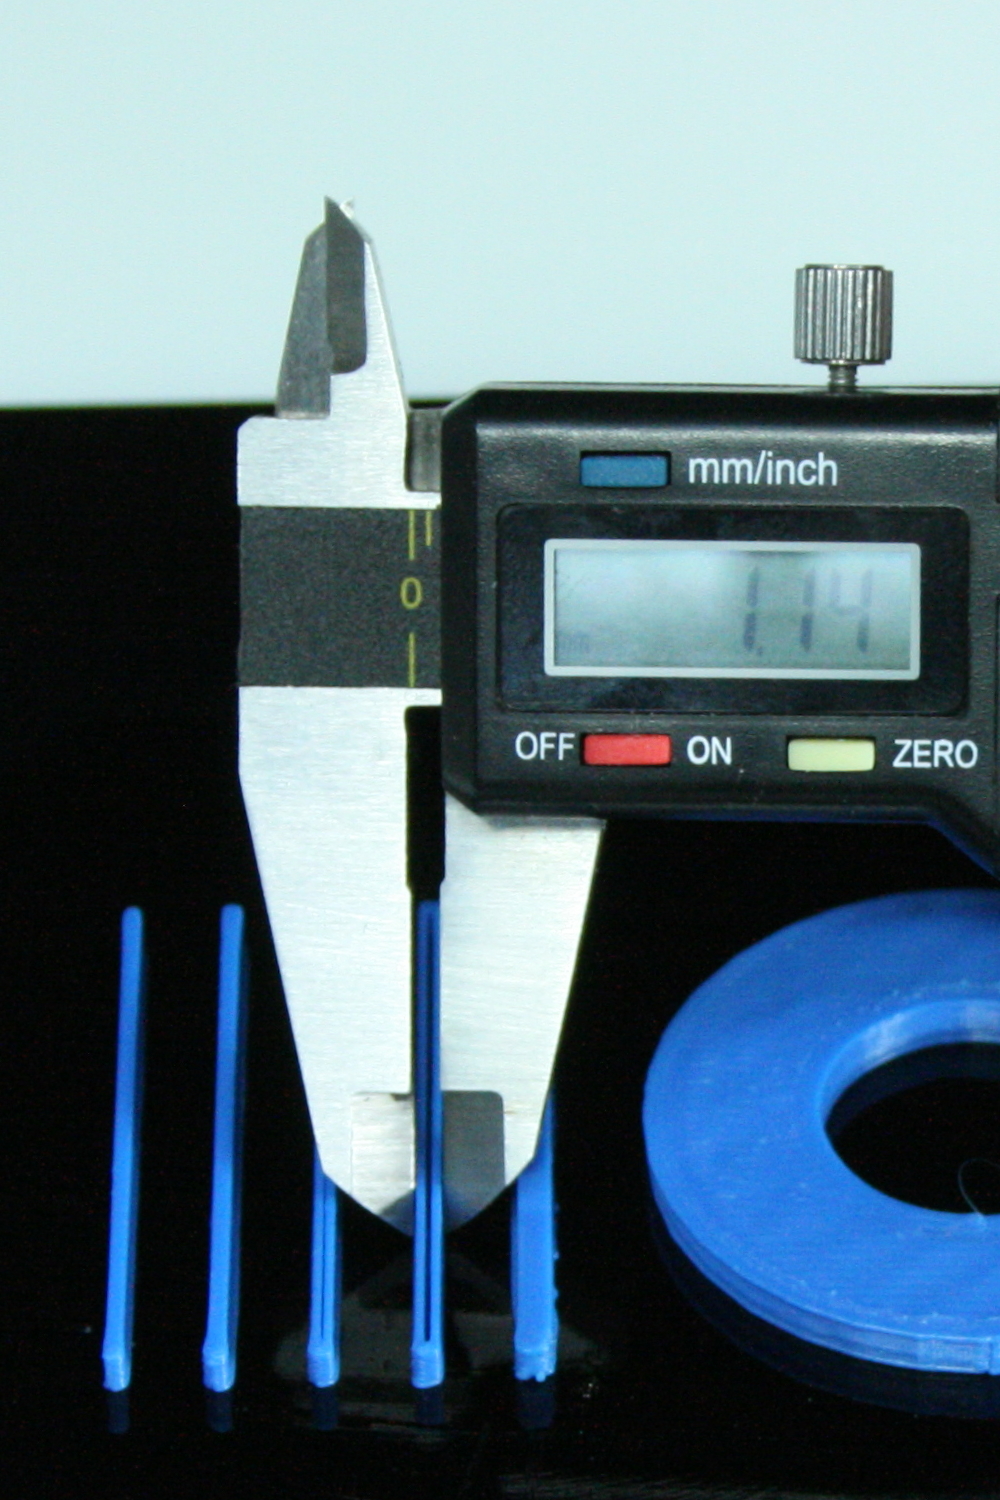 | |
| Designed 1mm - Printed 1.14mm |
One would think that if the Printjet is .5mm then anything above that width would be sized correctly. Logic suggests that a 1mm object would be right on the money. But, remember, the molten plastic is being pressed down and widened out. Obviously, the printer thinks that's enough to fill the gap between the walls. But, no so! The gap is even wider! But, oddly enough, the delta between our designed width and the actual width has started to narrow to just .14mm. That's pretty close, even if it is a bit ugly.
Object 05: A Cube 1.25mm Wide and 3mm High
 |
| Designed 1.25mm - Printed 1.50mm |
At a design specification of 1.25mm the delta between the design and the actual print broadens from .14 to .25. But, the object resumes its solid look. There is no gap between the walls.
Object 06: A Cube 1.5mm Wide and 3mm High
 |
| Designed 1.5mm - Printed 1.54mm |
At a designed width of 1.5mm, things start to look up for accuracy. The Cube printed the object at 1.54mm... a delta of just .04mm and that is wonderful. It would appear that this may be the sweet spot for both design accuracy and solidity.
Object 07: A Cube 1.75mm Wide and 3mm High
 |
| Designed 1.75mm - Printed 1.66mm |
Object 08: A Cube 2mm Wide and 3mm High
 |
| Designed 2mm - Printed 1.96mm |
The trend of being more narrow than the design specifications continues with an object with 2mm walls. And, so does the artifact that leaves a gap between the walls. The printed object is 1.96mm, which is pretty accurate. But, that gap sure does bother me.
Object 09: A Cube 2.25mm Wide and 3mm High
 |
| Designed 2.25mm - Printed 2.41mm |
Why the objects reverse the trend and be bigger than designed is a mystery. But, that is exactly what happened in this test when we move to a wall thickness of 2.25mm! It printed solidly. And, that is a good thing. But, it also printed at 2.41mm. So, we have to be aware of that when we design.
Object 10: A Cube 2.5mm Wide and 3mm High
 | |
| Designed 2.5 - Printed 2.78mm |
Circle Inner Diameter - 20mm
 |
| Measuring inner Diameter |
 |
| Inner Edge: Designed 20mm Diameter - Printed 17.71mm |
I used the inner measurement blades of the digital caliper to measure the inside edge of the circle. It was designed to be 20mm. It printed at 17.71. This is just about what I expected based on previous experience. If the tip of the extrusion PrintJet is centered right on the circumference of a 20mm circle then you need to account for the .25mm+ on each side of that center line. Taking into account the extra width due to compressing the layer and it comes out pretty close to our expectations and calculations. But, we always have to keep the fact that inside diameters will be SMALLER than designed in our minds when we design.
Circle Inner Diameter - 40mm
 |
| Outer Edge: Design 49mm Diamter - Printed 39.17mm |
WHAT IT ALL MEANS...
For most of us it simply means that we need to keep these behaviours in mind when designing objects to be printed on the Cube or any other extrusion style 3D printer. While the numbers were a bit different, Axon2 for the RapMan, produced very similar results. And, from posts in forums it seems to be a universal 3D extrusion type printer behavior.
The only people seriously affected by this behavior are those that want to use a single design on both an extrusion 3D printer and a high end 3D printer. That doesn't bother me a lot because my software package is so versatile and quick to use that creating two working designs is not all that difficult.
It's just something we all have to keep in the back of our minds as we design. And, I will have some test designs that will help nail down the most common parts interfacing sizes. Remember, plugs will generally be bigger and holes with generally be smaller in most cases. So, you cannot expect that a plug that you have designed at 8mm will fit into a hole that you have designed at 8mm. Your probably going to have to make one or the other bigger or smaller as part of the design process. The key is to get to know your printer so making these allowances becomes second nature.
I hope this was helpful. The next installment will be a plugs vs. holes demonstration.
Great post, Tom -- very informative! That was a good, easy-to-understand test. I was surprised by some of the results.
ReplyDeleteOne reason it seems to me that the washer's outer diameter is smaller than designed is that ABS shrinks as it cools. As do most materials.
The plastic starts out hot from the extruder head, and is placed onto a heated bed. It's cooling (and shrinking) from the moment it leaves the extruder and begins to harden. When everything cools down to room temperature there just has to have been at least some shrinkage.
I expect how much it shrinks depends a lot on both the part's size and its shape, and I don't know how to accurately estimate that. Especially how the shape effects it, in three dimensions!
Certainly, as the design size of the object grows larger, the cooling-related shrinkage (since it will be a relatively fixed percentage of the object's overall size) will become the main factor in parts not ending up being sized exactly as designed.
I've only checked the size of a few printed objects from my Cube. It's my first 3D printer and I was curious! I've seen shrinkage of around 0.7% for 50 mm long parts, and up to 1.4% for 100 mm long parts.
That's certainly an inherent characteristic of this method of 3D printing, for any printer that uses it.
In the meantime I'm using my Cube a LOT. In all cases it creates items way more accurately than I could make myself without it, using hand tools and making things manually. My friends and family are surprised at all the uses I'm finding for it.
And that's the real bottom line, for me. Now that I've got one, I can't imagine being without a 3D printer ever again.
I hadn't considered shrinkage. Thanks!
DeleteLike you, I cannot imagine NOT having a 3D printer now that I have one. Some years ago, I purchased a small milling machine that I ended up never using. I eventually gave it away. 3D printing is INFINITELY easier!
Hi Tom,
ReplyDeleteThank you for the thorough analysis. I think everyone of us (I am still waiting the cube almost 2 month) is greatful of your work.
I have extensive experience with the stratasys FDM printers. The reason that the models on Stratasys FDM the are more accurate is the presence of the support material which has a lower shrinkage than ABS. So it acts as a mold in injection molding. The reason that the inner diameter is smaller I think is because of the shrinkage which is .18mm/25.4mm. Not having any material to support toward the center the inner ring shrinks more and since the outer ring is already supported from the already builded material that's why you see less deviation.
I think you shuould do another test of a washer with a blind hole. I am sure that you with find a much smaller deviation than the through hole.
Thank you again
I appreciate the compliments! :)
ReplyDeleteI'll start a blind hole test this morning and post the results this evening. It will be very interesting to compare the results!
Thanks for the suggestion!
Hi Tom,
ReplyDeleteI finally got my Cube. And as I suspected dissapointment just at the start.
After installing according the instructions the printer start printing the first "rook". After 2 layers the cube turned off by itself with no apparent reason.
I tried to restart several times and the same turn off .....
Did this happend to you.
I think I got a refurbished unit since I see some dents in the case.
After 2 months wait and a series of problems with their website for accepting my payment I got this "piece of junk"
May be I am the unlucky one but I think they test their units before they ship. My unit run ofr only 2 minutes and than stoped for not working anymore.
Hopefully there is a solution.
I also want to know what it turns out to be. I didn't report the cartridge issue because it only happened in one cartridge and could have been a fluke. But, two people having the same issue should be reported to other users so that they can be aware of even the potential for a problem cartridge.
DeleteIt is probably NOT the Cube, itself.
DeleteOf the several that I have gone through, I had one cartridge that didn't feed correctly because some glue holding the sides of the cartridge together had dripped down onto the reel and glued it to the cartridge itself. That exhibited the same behavior.
To test the one in the machine, very carefully, pull the filament. It should come out VERY easily. If there is ANY binding, that may be the problem. If so, and you purchased extra cartridges and have another one, you might try a different cartridge.
I have forwarded your situation to everyone I know inside 3D Systems. They WANT to know about ANY issues people might have because they are committed to providing a satisfying user experience.
Tom,
DeleteThank you for the prompt response.
It is not the cartridge for 2 reasons.
1. The filament moves freely
2. The machine turns off right away as soon as I turn it on.
Another issue is reading files from the USB stick.
It took me 10 tentatives to read the files.
So the turn off in my case I think is a new issue.
Thank youo
Bummer!
DeleteThey wrote me right back and are jumping right on it. I assume you had contacted customer service. Let me know how it goes. You have an email address for me in the sidebar.
While I am not an employee of 3D Systems, I am still interested in seeing everyone have as good an experience as I have had.
This comment has been removed by the author.
ReplyDeleteTom,
ReplyDeleteThank you for taking over on my issue. Beeing for over 30 years in manufacturing as a mecchanical engineer I undersand that sometime bad quality products may pass. There are 2 ways to do QC from manufacturer or from the customer. In my case they chose the customer QC. It is impossible that a unit that is QC from the manufacturer out of the box doesn't work for the customer(with no apparent damage on the package). It is the same that a new car stops 10 feet from dealers door.
I think my unit is refurbished( or returned from other customers) and it has a "birth defect".
Again thank you for your help
I will keep you posted with the developments
I just got an email from the cubify people. They are going to ship a new cube for me tomorrow. The fact that they asnwer the email sunday tells that they are a serius company and some time mistakes hapend. This is the reason why I got the cube and not the other 3d printers that are in the market because is supported from a strong company with a good reputation.
ReplyDeleteTom,
ReplyDeleteLast week I did an experiment with a Dimension 1200 sst 3d printer by printing 3 washers same as your experiment. The washers were printed in 3 modes that the stratasys software allow you to print (Solid, High Density and Low desity).
The resouts are documented in 6 pictures that want want to publish but it is not possible through this blog.
I am sending you the pictures by email.
Keep in mind that printer cost $32K
Thank you again for your help
I'm happy to see that they jumped on this issue so quickly!
ReplyDeleteI did not get any images of the washers as yet. But, I will keep looking for them.
Hi Tom,
ReplyDeleteDo you know if anyone had hard time to update the firmware.
I don't know if I am unlucky or I am doing something wrong but I tried on 3 PC to connect the USB with the cube and it says that it can't update the firmware because it can't recognize the USB.
Is any thing I can do or there is a problem with the cube.
Thank you
This comment has been removed by a blog administrator.
ReplyDelete