Showing posts with label ABS. Show all posts

Tuesday, November 4, 2014

Cube 3 and ABS - Video

I created a video to demonstrate that it is possible to print ABS with the Cube 3 with the proper CubeStick application.  One of the things I fail to point out in the video is the special nature of the new print table that seems to act like a heat sink.  After printing the piece in the video I was surprised that the print table was as warm as it was.  It didn't get as hot as that of the 1st generation Cube; but, definitely was warmer that I'd experienced with the Cube 2 print table.

I could be wrong; but, I do not think the table is heated by any other means than simply absorbing heat from the printed object.


There was ever-so-slight warping at either end of the piece once it was removed from the print table.  But, NOTHING like that I had seen previously with my other 3D printers... including the heated 1st generation Cube.  I now believe it is possible to be completely successful when printing properly designed* ABS parts.

This is very important to me.  In fact, it's way more important than being able to print in two colors.  ABS has a very resilient quality to it that is quite different from PLA.  So, I am very happy to know that I can at east start experimenting with ABS again at an ever finer print resolution.

* By properly designed, I mean the strategic placement of holes and other structural relief elements that reduce stress from uneven shrinkage due to temperature changes.  Think of the ways iron bridges are constructed with triangular elements, etc. to use less iron while keeping the same structural integrity.  A bee-hive is another great source of inspiration for strength without too much bulk.

Wednesday, August 8, 2012

Shaping the Filament Tip for Loading

It is relatively important to shape the tip of the filament correctly before loading in any 3D printer.  The filament for the Cube is no exception.  Mike asked how I do this.  So, I thought I would mention several ways one can shape the tip correctly.

Since I'd had a 3D printer before the Cube, I'd already found ways to shape the end of filament using several different tools.

Flush Cutters

A micro flush cutter is a small cutting tool with cutting surface that is flat on one side.  This makes for a very clean cut.  Rio, a supplier of jewelry tools and supplies sells many varieties.

Micro Flush Cutter
 

Right out of college, my daughter set up a well equipped jewelry studio in our home.  It's still here.  As it became clear that shaping the tip of filament was important, I had a lot of tool choices close at hand.  Flush cutters will work.  But, it takes several cuts at different angles.

Nail Emery Board

The least expensive option is a simple emery board normally used to shape nails.


Emery Board

ABS filament is relatively soft and shapes very well.   For under $2.00 you usually can buy a set of boards with several different grits.

Dremel Sanding Wheel

Few tools are as versatile as a Dremel rotary tool.  This is my tool of choice in shaping the end of the filament before loading into either of my 3D printers.

Dremel Rotary Tool with Grinding Stone

The grinding stone attachment makes short work of shaping ABS plastic.. But, a light touch is a must.  Otherwise, it will melt the plastic.  Light touches as you go around the tip tip on all sides does the job very, very well.  Sanding wheels would also work well.

Obviously, these aren't the only ways to get the job done.  But, they represent 3 different approaches that I know work.

Monday, June 4, 2012

Second "Included Print File" Printed - Shoe

Here is the completed Macedonia Shoe that was printed in Delaware over the weekend,  The top view does an excellent job of showing how smoothly the Cube prints contours.

Macedonia Shoe Printed on Cube - Top

From the side, we see how it deals with large areas and holes.

Macedonia Shoe Printed on Cube -Side

Notice that there was no raft and no support required to print this very complex object.  There was not sign of warping and the only hint of anything but SMOOTH can be seen in one tiny flaw best seen in this view.

Full side view

This little extra extrusion material was easily flicked off.  In a design this demanding, this kind of performance is astounding to me.

But, there is something else that should be mentioned.  To simply print out the included free creations as novelties would be a big mistake.  They are excellent opportunities for learning.  Freedom of Creation is a company having designers that are masters at designing for 3D printing.  It is highly informative to check on the progress of the print in an object created by them.  It will reveal some helpful hints at how to design so that rafts and support are not needed.

Opposite side view

In this shoe, there are some interesting INTERNAL features at the part where the ball of the foot would be and also where the top connects to the back end of the shoe.  It's worth studying these.

Internal Support designed into Shoe #1
The pad in the sole of the shoe (above) seems to be one of the keys to the lack of a need for support.  But, the most interesting thing for me was the upper internal support design.

Cantilevered Support Structure
Kudos to Freedom of Design for coming up with these innovative solutions to reducing the need for external support structures.  And, kudos for the Cube in being able to pull it off.

Click on any of these images to see a 21mpx image that is more than capable of revealing every flaw.  NOTHING stands out as even worthy of notice over 99.9% of the print. 

To See all of the images of the finished show go to..

The Cube Print Longwood Gardens Field Trip Slide  Show


I continue to be impressed.  Very impressed.

Sunday, June 3, 2012

Fume Question Settled for Me

Some legitimate question has been raised about ABS fumes and the Cube.

This is not a definitive answer.  But, it's the one that counts for me.

I did not mention a thing about smell or irritation to my family as I set up the Cube in my daughter's home.  I wanted to see what my family would say without any influence from me.

The Cube printed for well over 8 hours and not one of my family mentioned anything at all about any smell or fumes.

After we left for home, I directly asked my wife if she noticed any smell.  And, her answer was, "No."

I can't speak for everyone.  But, I do know that my wife and daughter have what I would consider very sensitive senses of smell.   If there was even a HINT of something obnoxious they would have noticed it.

It passed the test that counts for me.  And, while I know that is a completely subjective observation, it's the only measure that I can offer.

I hopes this helps those that might be concerned.  :)

The Cube Travels Well

A lot of thought was put into the design of the box in which the Cube arrives.  My advice is to NOT throw it away.  It makes for a great travel case for your Cube.  I know because my Cube went on a visit to see my granddaughters yesterday.

How many times do you hear somebody praise a BOX?  Not many.  But, the Cube box is designed to travel well and the Cube is one of those products that you'll want others to see and experience.

Putting the Cube back in the box to prepare for travel was a piece of cake!

If you have children or grandchildren in that 9-12 range you know how eager they are to be able to do things for themselves.  Taking the Cube out of the box and setting it up was no exception. With very few prompts from me, they had it up and running in no time.  They even figured out, on their own, that they had to remove the little screw in the cartridge that keeps the filament locked in place while traveling.

Having now had the experience of following the loading directions, I knew it would make it easier for them to cut off the filament about 6 inches above the printjet when packing it up.  That made it very easy for them to follow the Cube's on-screen directions.  Nothing baffled them in the process of setting it up.

They then chose to print the Macedonian shoe...

Macedonian Shoe - Early in the Process of Printing
Now, the shoes are among the largest objects of the creations that come free with the Cube.  The time estimate showed 6 hours and 33 minutes to print and it actually took longer.  It's amazingly intricate and, even more amazing, was set up to print without raft or supports.

3D printing, by it's very nature DOES take time.  But, that doesn't mean you have to sit around waiting for it to finish.  You get it started and go off to do other things for that period of time.  In our case we decided to go to one of our favorite places, Longwood Gardens.

So, while Henry the Cube... yes the girls decided to name it... did its thing, we did ours.

However, there is one thing that needs to be mentioned that happened before leaving for Longwood.  My youngest watched the Cube build the shoe and, with a huge smile, said...
"I feel so proud... even though I didn't do anything"
THAT is a pretty significant statement about the emotional aspects inherent in 3D printing in the home.  Watching the Cube print is an inherently SATISFYING experience.  And, even though she only selected the item and pushed the LCD to get it started, she felt a deep sense of being part of the process.  I feel this every time I start a piece, whether it is one of mine or was designed by somebody else.  And she felt it too.

I had one Rook that I'd printed on the Cube and several others that I got from the 3D Systems people before the Cube shipped.  I thought it would be nice to take them on an outing while the Cube did its thing.  So, off we went!

Here Red Rook and White Rook survey the topiary garden for the first time.

Red Rook and White Rook overlooking the Topiary

 Liking what they saw,  they sped off to play among the topiary.


Frolicking among the Topiary
They even joined my granddaughter's for a game of hide and seek!

Green Rook enjoying Hide and Seek

While most of the rooks played hide and seek, Blue bracelet contemplated how the Cube might be able to create a sundial of their own.  Red rook, having worn itself out, joined bracelet.

Blue Bracelet planning a Cube Sundial
But, Yellow Nano, being made of VERY tough stuff, preferred to hang around with the tough guys at the topiary garden entrance.  None of that "sissy" stuff for her!  If only stone lions had Nanos!  What a pair!


Moving inside the massive conservatory, after all that exercise, Red Rook demanded to be carried as they contemplated the beauty of these magnificent indoor gardens and fountains.

Red Rook taking in the Conservatory Fountains
But, while they found the indoor fountains fascinating, all of the Cube prints agreed that the most spectacular of the many fountains to be found at Longwood were those that could be seen from the Conservatory's patio. 
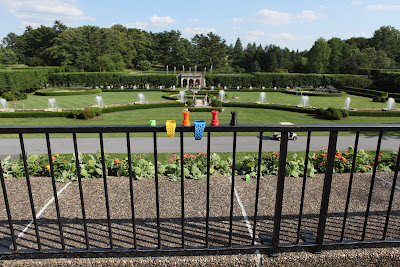
Cube Prints taking in the front lawn fountains
But, like any field trip with a bunch of eager kids, this one, too, almost had a tragedy.  While you can see it in the above picture, it's better shown below.  Why do Cube pieces ignore the warnings about not going too near the edge???  A gust of wind and off went Green Rook!


Fortunately, I had a monopod and was able to rescue him.  And, I THOUGHT he'd learned his lesson.  But, I was wrong.  There was a Wine & Jazz festival going on.  Some rooks just CANNOT hold their alcohol!

There's always one... sigh...
A little food in his stomach at the Italian Gardens helped and we had no more trouble with Green Rook the rest f the trip.  He does love cookies!

Great cookies, great fountains, great friends... Life is good!

I had a wonderful time combining three things that I greatly enjoy... Longwood Gardens, photography and 3D prints.  There are many more photos on my Flickr site. You'll see dragons, tree houses, fields of light and the full beuty of the Italian garden.  To experience a slide show of the full Cube print field trip go to...

The Cube Print Longwood Gardens Field Trip Slide  Show

In the meantime, let's get back home to see how things progressed with the Cube!!!

By the time we arrived back to the house, 6 hours had passed.  The Cube was still printing.  But, the girls and I could see that it was doing a phenomenal job!  We were amazed and pleased by what we saw.

The detail of the Macedonian shoe is impressive
 This was the first time I'd printed out a large object on the Cube.  They still need to work on getting the estimated build time just right.  But, that is a minor issue when one sees the quality of the print with such an intricate pattern without raft or support.

We ended up having to leave for home before the print was complete.  But, my daughter reports that it is finished and beautiful.  I'm going back to retrieve the Cube this evening.  Yes, I KNOW it's a 180 mile round trip.  But, if you think I'm going without my Cube for even a few days, you'd better think again!  LOL!


Friday, June 1, 2012

Can the Scope be Helpful in Other Ways?

I know that some of you are saying, "Come on Tom.  Things can't be as rosy as you've shown so far!"

And, you are right.  They can't.

The Cube, like any other 3D printer is laying down a series of layers of melted plastic that must adhere to the previous previous layer of plastic that may or may not be positioned directly under it.  Moreover,  that cooling layer is sandwiched between a hotter layer above it and a cooler layer below it.  There can be hundreds of such layers.  I've not seen ANY 3D printer that lays down layers that are perfect at all wall thickness or angles 100% of the time.

ABS is tough, has a feel to it that is a LOT more pleasing than PLA and just plain looks nicer.  But, it has a tendency to warp.  I've already mentioned that I would prefer to use ABS plastic in my other 3D printer.  But, I can't.  Without a heated bed, it warps so badly that I just can't use it.

I love the fact that the Cube has a heated bed.  But, that does not mean that in some circumstances a little warping might not occur.  When that happens, we will see a line that is different in the sides of our printed objects.

One of the reasons I designed my torture test with differing wall thickness and shapes is to see how the Cube/ABS combination performs under completely different circumstances in the same print run.  And, to learn from what I find to design things that avoid potential issues.

A finding is not "Good" or "Bad".  It's "What".

And, the "What" that shows up in my torture test is that wall thickness makes a difference.  That's not surprising to me.  But, if you are a new 3D printer owner, it might be a BIG surprise to you.  Let's take the "surprise" out of it by seeing what it is up close.

I have to apologize for this picture.  All I have here right now is an old Sony Bloggie with absolutely no control over the exposure.  Here is the part that has a wall thickness of 1mm, the thickest of the objects in the torture test.  (I'll replace this picture later with a clearer one)

Part with 1mm walls

As you can see, there is a layer that is not absolutely perfect.  And, that imperfection extends around the part from the sphere to the extruded triangle.  That is what warping looks like.  None of the thinner pieces showed this characteristic.

There is something else that is not so easy to see in this particular photo.  But, CAN be seen under the microscope.  This is the wall of the box from the top.  Notice that it is not solid.

Top of 1mm box

This is a behavior that I have seen over and over in my first 3D printer and in countless images in 3D discussion forums.  Certain thicknesses are more difficult for 3D printers than others.  The trick to avoid this is to know what thickness are optimal and which are not.  Obviously this has repercussions to the overall integrity of the object.

We know we can avoid this by designing our wall at .5mm or .75mm.  We can probably also avoid this by making our wall 1.25mm.  Remember, I said our findings aren't "Good" or "Bad".  They are "What" and the "What" in this case let's me know that I probably am better off avoiding 1mm walls in square boxes.

So, how might this have affected the overal piece?  The clue is to the bottom left and out of focus.  That is a single piece of filament that broke ranks and missed the corner.  And, it's right at the layer that shows evidence of warping.

Seen from the microscope's perspective, it's plain that this errant strand, probably allowed by the hollow wall, started the warping snowball.

Corner of warped layer

This is the picture of the corner and layer where that filament took a shortcut.  As I said, wall thickness DOES seem to make a difference.

But, here is something else that is interesting.  NONE of the prints of the twisted star show any signs of weakness or warping.  The wall is just a little thicker than 1mm.  And, a close look reveals another interesting bit of information that we can use to our advantage.  Not only wall thickness; but, wall orientation seems to make a difference.


Here we see the same wall in two different orientations.  Notice that the bottom orientation shows a different inner characteristic than that of the top orientation.  One seems more solid than the other.  I find that fascinating.

What this seems to suggest that if we have a part that seems prone to warping, etc.  We might just want to try it at a different orientation on the print bed.  I don't know for sure that this will cure the problem.  But, it certainly suggests that rotating the part in the software that we use to convert STLs to Cube files might help.

 In my case, it prompts me to go back into my 3D software and design an STL having several copies of this part with 1mm walls oriented in different ways to see if a different behaviour emerges.

This is a printer/plastic behavior.  Not  a printer/plastic problem.  It's a DESIGN problem.  

I consider that it's my job to use up filament chasing down design problems so that you don't have to!  :)