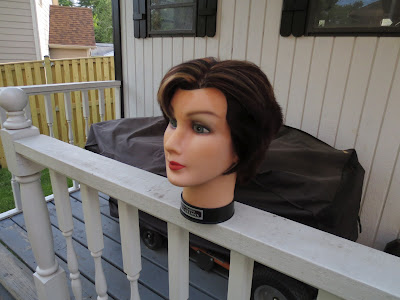
In experiments, while the technology was a lot of fun, it turned out that the mesh that it created wasn't absolutely clean. So, there was some question as to how useful it would be for the real application that I'd hoped to use it for... 3D printing.
Last week, the topic came up in the Bits From Bytes forums and I decided to give 123D Catch an opportunity to see if I could come up with a way to use it with a 3D printer. This post is about that experiment.
First, let me show you 123D Catch in action and explain how it works. It starts with a series of photographs like this one...
And then we bring all of the photographs into 123D Catch.
 | |
| 123D Catch Application |
Bringing the series of images into 123D Catch, the program calculated the position of the camera for each shot and then stitched together the images to create a 3D model. From the front it looks like it did an excellent job. But, that is only partly right. As seen from this rotated view.
 |
| Holes in the 123D Catch Mesh |
The hair has confused 123D Catch so much that it maps grass onto the head! Obviously, this is NOT going to do all that well in a 3D printer. A 3D Printer needs a "Watertight" mesh to print well.
Fortunately. we have a solution. We export the 123D Object into a format that can be read by a wonderful free program called NetFabb Studio Basic. NetFabb's job is to find and fix problems with mesh and to export a clean STL file for printing. When we bring it in, the offending holes are clearly visible.
 |
| NetFabb on Entry |
A huge warning sign tells us that we have a problem that needs to be fixed. Clicking on the "+" sign brings up a dialog that allows us some options for fixing the mesh. Here is the resultant fix.
 |
| NetFabb Fix |
So, how did it print? Take a look.
 |
| Original Photo |
 |
| RapMan 3.2 Print of 123D Catch Object |
Frankly, I'm astounded by the result. It even got the hair flip! The nose probably could be a bit better. But, who's complaining.
What this means is that we will be able to create 3D prints on our Cube 3D printers of our loved ones! I plan to capture my grandchildren this weekend. Because the 123D Catch engine has issues with hair, I will try to add something that gives the engine something to lock onto like a colorful hat or ribbons. This is no small deal and it is capabilities like this that will go a long way to winning over the 3D printing skeptics!
I'm certainly a believer. :)
NOTE: I expect the Cube print to be noticeably cleaner than what you see in these images.


I stick a few colored inventory sticker dots on the hair to give 123D Catch some features to resolve the hair issue. We are only interested in capturing the shape anyway. If the texture is at issue, photoshop can be used to hair-out the color spots on the unwrapped texture picture.
ReplyDeleteThat's a great idea! Texture isn't a big issue. Thanks!
ReplyDeleteBy the way, are you the Damon Swanson that creates 3D train models? If so, that is W-A-A-A-Y cool!
ReplyDeletewhat sort of printer did you use?
ReplyDeleteFor the object in the image above I used a RapMan 3.2. I had printed it just before the Cube arroved. But, now I'd use my cube.
ReplyDelete